LM Link Guide: Connect LM Studio Desktop to Google Colab's CLI
You want to run capable, high-parameter AI models, but your everyday hardware simply can't keep up. Whether you're on a thin-and-light laptop, an older desktop, or a machine with no dedicated GPU at all, the system struggles and responses crawl out token by token. Thankfully, whether you want to leverage a free cloud GPU like Google Colab, or you need an easy way to connect to a powerful home rig while on the go, LM Link solves this seamlessly.
While this tutorial uses Google Colab's free NVIDIA T4 GPU (16 GB of VRAM) as the demonstration environment, the same LM Link concepts and steps apply regardless of your setup. Whether you are connecting a cloud GPU to a local laptop, linking two of your own PCs, or setting up a home AI server to access on the go — this guide has you covered. No ngrok, no complex tunnels, no third-party services required.
By the end of this guide, you will understand how LM Link works and have a fully working remote LLM setup you can adapt to any combination of machines.
🚀 Open and Run the Complete Notebook in Google Colab
What You'll Build
Here's the architecture in plain terms:
- The Host (Remote): Google Colab running the
lmsCLI to load the model on a free T4 GPU - The Client (Local): Your laptop running the LM Studio desktop app to chat with the model
- The Connection: LM Link creates a secure, encrypted tunnel between them
Result: You get the full LM Studio experience — chat, API access, integrations — powered by a remote GPU, regardless of which combination you use.
Wait, do I have to use the CLI? Not necessarily! While this tutorial demonstrates using the headless
lmsCLI on a cloud GPU and the LM Studio GUI on a local laptop, this exact guide applies to any combination of setups. You can use the CLI on both machines, the GUI on both machines (like connecting a home PC to a travel laptop), or any mix in between. Whatever your hardware or preference, follow the steps below to get the hang of how LM Link works.
Note: While this guide uses Google Colab as a free and accessible example, these exact commands and steps work identically on RunPod instances, vast.ai, AWS EC2, or your own headless home Linux server.
What is the LM Studio CLI (lms)?
Most people know LM Studio as a desktop GUI app for running local AI models. What's less known is that LM Studio ships a fully featured command-line interface called lms, available from LM Studio 0.2.22 onward with no additional installation required. It lets you load and unload models, start or stop the API server, download models, and more, entirely from the terminal.
For truly headless environments like Google Colab, Linux servers, or cloud VMs where no display is available, LM Studio also provides llmster — a standalone headless daemon released as part of LM Studio 0.4.0. Think of llmster as the core LM Studio engine packaged for server-native deployments. The lms CLI then communicates with whichever is running (the desktop app or llmster) to execute your commands.
Here's a quick reference of the key commands you'll use in this tutorial:
| Command | What It Does |
|---|---|
lms daemon up |
Starts the background LM Studio service |
lms login |
Authenticates your CLI with your LM Studio account |
lms ls |
Lists all downloaded models |
lms get <model> |
Downloads a model from LM Studio's catalog |
lms load <model> |
Loads a model into GPU/CPU memory |
lms ps |
Lists all models currently loaded into memory across the network |
lms link status |
Checks the connection status and lists all linked devices |
What is LM Link?
LM Link is a new feature in LM Studio that provides a way to access local models across devices, wherever you are. Links are custom-made, end-to-end encrypted networks intended for loading and serving LLMs across devices you own, made possible in partnership with Tailscale.
It is incredibly versatile. You can use it to connect your laptop to a cloud instance (like we'll do here with Colab), or leave your powerful desktop PC at home running LM Studio, and access its heavy-lifting GPU power from a coffee shop using your thin-and-light laptop.
How It Works Under the Hood
LM Link is not a simple OpenAI-compatible API tunnel. It's a dedicated peer-to-peer networking layer built on tsnet, an embeddable Go library provided by Tailscale. This creates a secure connection without touching your OS kernel sockets or routing tables, meaning LM Link will not interfere with any existing Tailscale VPN you might have running.
When you connect two machines via LM Link, they authenticate and establish an end-to-end encrypted, direct peer-to-peer connection, regardless of what network each device is on, with no exposure to the public internet.
The Full Communication Path
Because LM Link handles the API bridging internally, you don't even need to run a standalone HTTP server on the remote machine. Here is how a prompt actually flows:
- You send a message in the desktop LM Studio app on your laptop.
- The app sends the request to
localhost:1234(its local API endpoint). - LM Link intercepts this, sees the loaded model is on the Colab (remote) device.
- It routes the request over the Tailscale E2E encrypted tunnel directly to the Colab daemon.
- The model on Colab processes it and returns the response the same way.
- Your desktop app receives the response exactly as if it were running locally.
What This Means for You:
- Zero Data Snooping: Your prompts and responses go directly device-to-device. Neither Tailscale nor LM Studio's backend servers ever see your chat content.
- Seamless Integrations: Any tool pointing to
localhost:1234on your desktop (e.g., Cline, Kilo Code, Open Code) will transparently use the remote Colab model through LM Link.
For a deeper dive into the technical capabilities and REST API usage, you can check out the official LM Link documentation.
Prerequisites
Before you start, make sure you have the following:
For all setups:
- A free LM Studio account — sign up at lmstudio.ai (needed for device pairing on both machines)
Installation of LM Studio (desktop app or CLI) is covered step-by-step in the tutorial below.
For the Colab demo in this tutorial (additional):
- A Google account for accessing Google Colab
- Basic comfort with Jupyter/Colab notebooks (you just need to run cells in order)
Step-by-Step: The Complete Colab Setup
You have two options to proceed: you can either follow the manual, step-by-step instructions below to understand exactly how the system works, or you can instantly clone our pre-built 1-Click notebook:
🚀 Open and Run the Complete Notebook in Google Colab
(If you chose to build it yourself, open a new Google Colab notebook and follow these steps in order).
Step 1 — Set the Runtime to T4 GPU
Before writing a single line of code, switch your Colab runtime to use a GPU:
- Click Runtime in the top menu
- Select Change runtime type
- Under Hardware Accelerator, choose T4 GPU
- Click Save
This gives you access to an NVIDIA T4 with 16 GB of VRAM — enough to comfortably run quantized models up to 20B parameters and beyond.
Step 2 — Install the LM Studio CLI
In your first code cell, run the official LM Studio install script:
Using a VPS or Home Server? If you are running these commands on a traditional Linux server (like RunPod, vast.ai, or an Ubuntu machine via SSH) instead of a Jupyter Notebook, simply drop the
!prefix from the commands below and run them directly in your terminal.
!curl -fsSL https://lmstudio.ai/install.sh | bash
What this does: Downloads and installs llmster — LM Studio's standalone headless daemon — into your home directory (which resolves to /root/.lmstudio/ because Colab runs as root). Because Colab has no display, we use llmster instead of the desktop GUI. The install script also sets up the lms CLI, which is what you will use to control it. It auto-detects your system architecture (Linux x86_64 on Colab) and handles everything automatically.
Expected output:
Downloading llmster 0.0.11-1 Linux x86_64
##################################################### 100.0%
Verifying checksum...
Installing llmster...
Install completed at /root/.lmstudio/llmster/0.0.11-1.
Installation finished successfully! llmster is ready to launch.

To start the daemon, run:
  lms daemon up

To add lms to your PATH, either restart your shell or run:
  export PATH="/root/.lmstudio/bin:$PATH"
Step 3 — Add lms to Your PATH
Colab's shell doesn't automatically pick up the newly installed binary. Add it to the PATH with this Python cell:
import os
os.environ["PATH"] += ":/root/.lmstudio/bin"
Why this cell instead of a shell export? In Colab, each ! command spawns a new subshell, so export PATH=... doesn't persist between cells. Setting it via os.environ ensures it applies to all subsequent ! commands in the session.
Step 4 — Verify the Installation
Confirm lms is accessible and working:
!lms --version
Expected output:
CLI commit: 0b2a176
If you see this, you're good to go.
Step 5 — Start the LM Studio Daemon
!lms daemon up
Expected output:
Waking up LM Studio service...
llmster started (PID: 5930).
The daemon is the background process that manages models, the API server, and the LM Link connection. Everything else you do depends on this running. If you run this cell again and see The daemon is already running (PID: XXXX) — that's completely fine, just move on.
Step 6 — Authenticate with Your LM Studio Account
This is the step that ties your Colab session to your LM Studio account:
!lms login
Expected output:
Visit https://lmstudio.ai/pairing and enter the following code to authenticate:

  light poster wire

Or visit the following URL directly:

  https://lmstudio.ai/pairing?code=light-poster-wire

Authentication successful.
What you need to do:
- Your Colab output will show a unique 3-word code (e.g.,
light poster wire) - Visit
https://lmstudio.ai/pairingin your browser and enter the code - The Colab cell will automatically detect the authentication and complete
Step 7 — Check Your Model Library
!lms ls
This shows what models are available. Because you just paired your devices in the previous step, lms ls is now aware of your entire LM Link network!
If you already have LM Studio open on your home laptop or desktop and have enabled LM Link (which we'll do in Accessing Your Remote Models), you will see models listed from both your local Colab instance (labeled Local under the DEVICE column) and your remote devices:
You have 3 models, taking up 6.72 GB of disk space.

LLM                            PARAMS    ARCH      SIZE       DEVICE
qwen/qwen3.5-9b (1 variant)    9B        qwen35    6.55 GB    YourLaptopName

EMBEDDING                               PARAMS    ARCH          SIZE        DEVICE
text-embedding-nomic-embed-text-v1.5              Nomic BERT    84.11 MB    Local
text-embedding-nomic-embed-text-v1.5              Nomic BERT    84.11 MB    YourLaptopName
(If Colab is your only active device right now, you'll simply see the default Local embedding model).
Step 8 — Download a Model
Now download the LLM you want to run. For this tutorial, we're using Qwen 3.5 9B — an excellent general-purpose model that fits perfectly on the T4's VRAM:
!lms get qwen3.5-9b
The CLI automatically searches LM Studio's model catalog and resolves the best quantization for your hardware. It picks Qwen3.5 9B Q4_K_M [GGUF] at 6.55 GB — this is the Q4_K_M quantization, offering the best balance of quality and VRAM usage for the T4.
It will then prompt you to confirm the download:

Important: Even though Colab isn't a traditional terminal, you must interact with this prompt. Click towards the right of the 'select', a small input box appears, type
Yes, and the download will begin. You can also run the same command in the Colab terminal for easier selection.
⠇ [██████████████████████] 99.73% | 6.53 GB / 6.55 GB | 41.82 MB/s | ETA 00:00
Finalizing download...
Download completed.
After download, verify with !lms ls:
You have 4 models, taking up 13.27 GB of disk space.

LLM                            PARAMS    ARCH      SIZE       DEVICE
qwen/qwen3.5-9b (1 variant)    9B        qwen35    6.55 GB    Local
qwen/qwen3.5-9b (1 variant)    9B        qwen35    6.55 GB    YourLaptopName

EMBEDDING                               PARAMS    ARCH          SIZE        DEVICE
text-embedding-nomic-embed-text-v1.5              Nomic BERT    84.11 MB    Local
text-embedding-nomic-embed-text-v1.5              Nomic BERT    84.11 MB    YourLaptopName
Step 9 — Load the Model into GPU Memory
Downloading a model and loading it are two separate steps. Now load it onto the T4's GPU:
!lms load qwen3.5-9b
Expected output:
Model loaded successfully in 28.77s.
(6.10 GiB)
To use the model in the API/SDK, use the identifier "qwen/qwen3.5-9b".
The model loads 6.10 GiB onto the T4 GPU in about 28 seconds.
Network-Aware Loading: Because LM Link is active,
lms loadis incredibly smart. If you skip Step 8 and try to load a model that isn't downloaded on Colab but is available on your desktop, Colab will actually load the model on your desktop's hardware over the network! (If it's downloaded on both, it will ask you which device to load it on if you run it interactively in a real terminal).
You can verify exactly what models are loaded into memory across your entire LM Link network at any time using:
!lms ps
Tip: Managing Your Connection
Because you logged in during Step 6, LM Link is automatically enabled and your Colab instance is already reachable! If you ever want to temporarily disconnect the Colab instance from your network without completely logging out, you can run!lms link disable. When you're ready to reconnect, simply run!lms link enableand it will instantly come back online without requiring a new pairing code.
Accessing Your Remote Models
Once you have completed the Colab setup, your remote GPU is fully integrated with your local desktop app. This next step is identical regardless of your setup:
- Open LM Studio on your client machine (your laptop or desktop).
- Click the Settings icon (gear icon) at the bottom of the left sidebar.
- Click on Login to LM Studio Hub and sign in with the same LM Studio account used on Colab.
- Still in Settings, navigate to the LM Link tab and turn the Enable LM Link toggle to ON.
- In the settings, click on the 'Developer' option and turn it on.
- Click on the LM Link icon at the bottom of the sidebar.
- The remote host should now appear as a connected endpoint, named after its device or session.
- As shown in the image below, you should see the remote Colab model listed in the top dropdown alongside your local ones, distinctively marked with a network icon. You will be able to control the remote model from there itself, including ejecting it and loading with custom parameters.
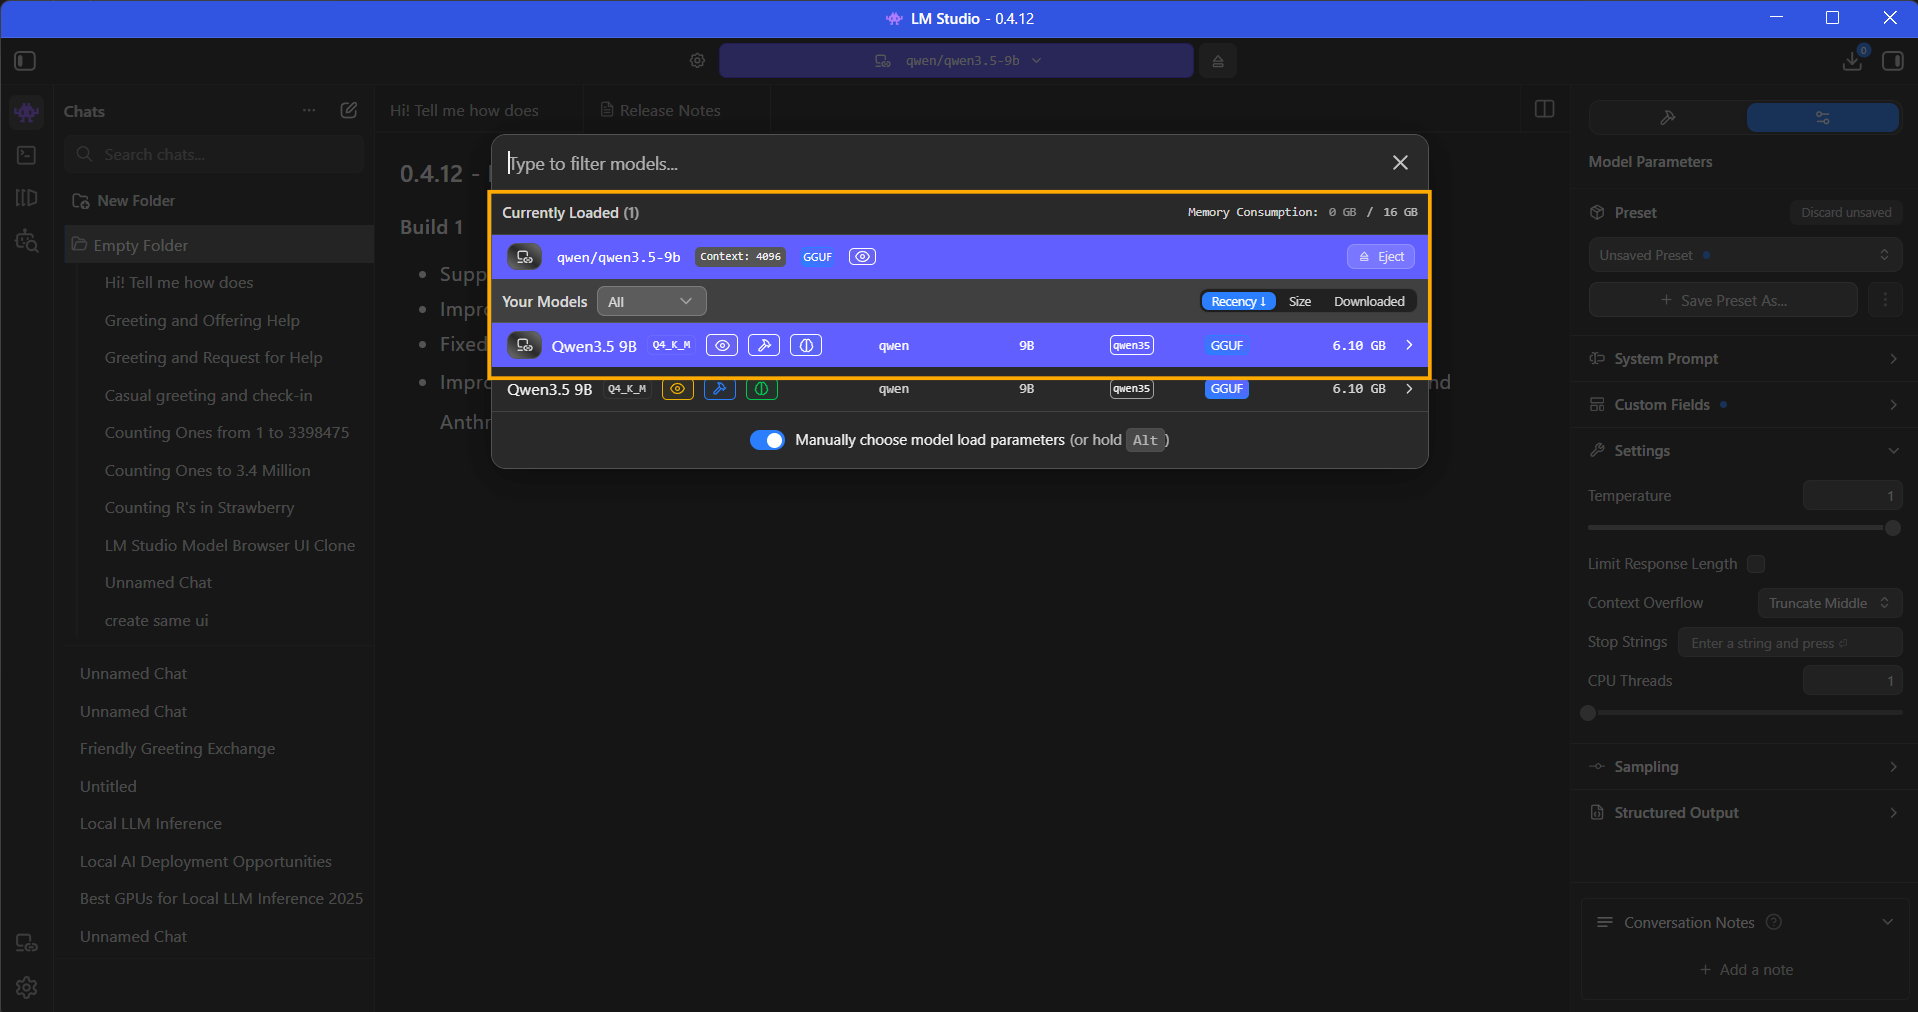
Because LM Link is fully integrated, you can even manage the remote machine's memory directly from your laptop or local machine. As shown in the image above, you can see the remote model is "Currently Loaded", along with a live readout of Colab's VRAM consumption (e.g., 8 GB / 16 GB). You can eject or load new models onto the Colab GPU simply by clicking them in this menu, without ever needing to type another CLI command!
Using two desktops / GUI on both? The steps are even simpler: install LM Studio on both machines, sign into the same account, go to Settings → LM Link → Enable LM Link on the host, and the client discovers it automatically.
You can now use LM Studio exactly as you normally would — the chat interface, the API playground, coding integrations — but all the heavy lifting is happening on the remote machine.
Common Issues and How to Fix Them
| Problem | Cause | Fix |
|---|---|---|
| T4 GPU not available on Colab | Free tier has limited GPU availability | Try at off-peak hours or use Colab Pro; alternatively use CPU temporarily |
| lms login pairing code times out | Took too long to enter the code | Re-run !lms login to generate a fresh pairing code |
| Model download gets stuck or fails | Colab network fluctuation | Re-run !lms get <model> — downloads resume from where they left off |
| LM Link shows offline after a while | Colab session idle timeout (~5-15 min on GPU instance) | Re-run !lms daemon up and !lms link enable to restore the connection |
| lms command not found | PATH not set | Re-run the os.environ["PATH"] cell and try again |
| Model loads on CPU instead of GPU | Runtime not set to T4 | Check Runtime → Change runtime type, ensure T4 GPU is selected |
| lms daemon up says already running | Daemon persisted from previous cell | This is fine, just proceed to the next step |
Why Use This Over Alternatives?
Since you can install almost any inference engine (Ollama, llama.cpp, vLLM) on a remote machine, the real challenge is networking. How do you securely route your local IDE's traffic to that remote cloud GPU? Here is how LM Link compares to standard networking alternatives:
| Networking Strategy | Pros | Cons |
|---|---|---|
| LM Link Mesh (This Tutorial) | Almost zero-config routing; E2E encrypted; no public URLs; multi-device visibility; instant GUI integration. | Requires an LM Studio account; proprietary to the LM Studio ecosystem. |
| Public Tunnels (ngrok, pinggy) | Engine-agnostic (works with anything); fast to script. | Free tiers give random URLs and rate limits; exposes APIs to the public internet unless you actively configure edge authentication. |
| Edge Proxies (Cloudflare Tunnels, Tailscale) | Production-grade; highly secure; offers permanent URLs or private WireGuard IPs. | Cloudflare requires domain ownership. Native Tailscale is powerful but lacks the purpose-built LLM GUI integration that LM Link offers. |
| Direct Local Execution | Zero network latency; works completely offline. | Bottlenecked entirely by your physical hardware; large models are painfully slow on CPU. |
Fun fact: LM Link is actually powered by Tailscale's tsnet (userspace WireGuard) under the hood!
LM Link wins for personal orchestration because it provides the enterprise-grade security of Tailscale, but packages it into a purpose-built, one-click interface designed specifically for managing LLMs across a fleet of devices.
Tips for Getting the Most Out of Colab's T4
- Stick to Q4_K_M quantization for models up to 13B. It's the sweet spot between quality and VRAM. The
lms getcommand picks this automatically. (For a deep dive into VRAM needs, check our LM Studio VRAM requirements guide). - The T4 has 16 GB VRAM, so you can comfortably run 9B models and push into 13B with the right quantization (Q3 or Q4).
- Monitor GPU memory with
!nvidia-smibetween steps. You'll see the model occupying VRAM afterlms load.
What You Can Do With This Setup
Once LM Link is active and your desktop app is connected, you have a fully functional remote LLM backend. Here are some practical things to try:
- LM Studio Chat UI: Use the familiar chat interface in LM Studio, backed by the Colab GPU (Or any remote GPU)
- AI Coding Assistants: Point coding assitants like Claude Code, Codex, Cline, Kilo Code, or Open Code to
localhost:1234in your IDE settings — they will route through LM Link to Colab for AI coding tasks and chat. - Python API calls: Use the OpenAI Python SDK pointed at
http://localhost:1234/v1with any API key string. It routes through LM Link transparently - RAG pipelines: Build a local retrieval-augmented generation pipeline using LangChain or LlamaIndex with the remotely hosted model as the LLM backend
- Test larger models: Experiment with 27B, 35B, or even quantized 70B models that would be impossible to run locally
- Headless Fleet Orchestration: Because
lmsacts as a network-wide control plane, you can open an interactive terminal on Colab (using the terminal icon on the left sidebar) to orchestrate your entire hardware fleet. First, runlms lsto view all available models across all linked devices. Then, runlms loadinteractively to get a navigable menu that allows you to push any model onto the specific GPU of any connected device!
Integrating with AI Coding Assistants and Agents
One of the most powerful use cases for LM Link is offloading your local coding tools (like Cline, Claude Code, or Codex) to a remote GPU. (You can watch this exact integration in action starting at 4:15 in our video tutorial above).
Because LM Link seamlessly handles the networking, you don't need to expose your Colab instance to the public internet. Your local machine handles the API surface at localhost:1234, while the model runs on the remote hardware.
Setting up the Server
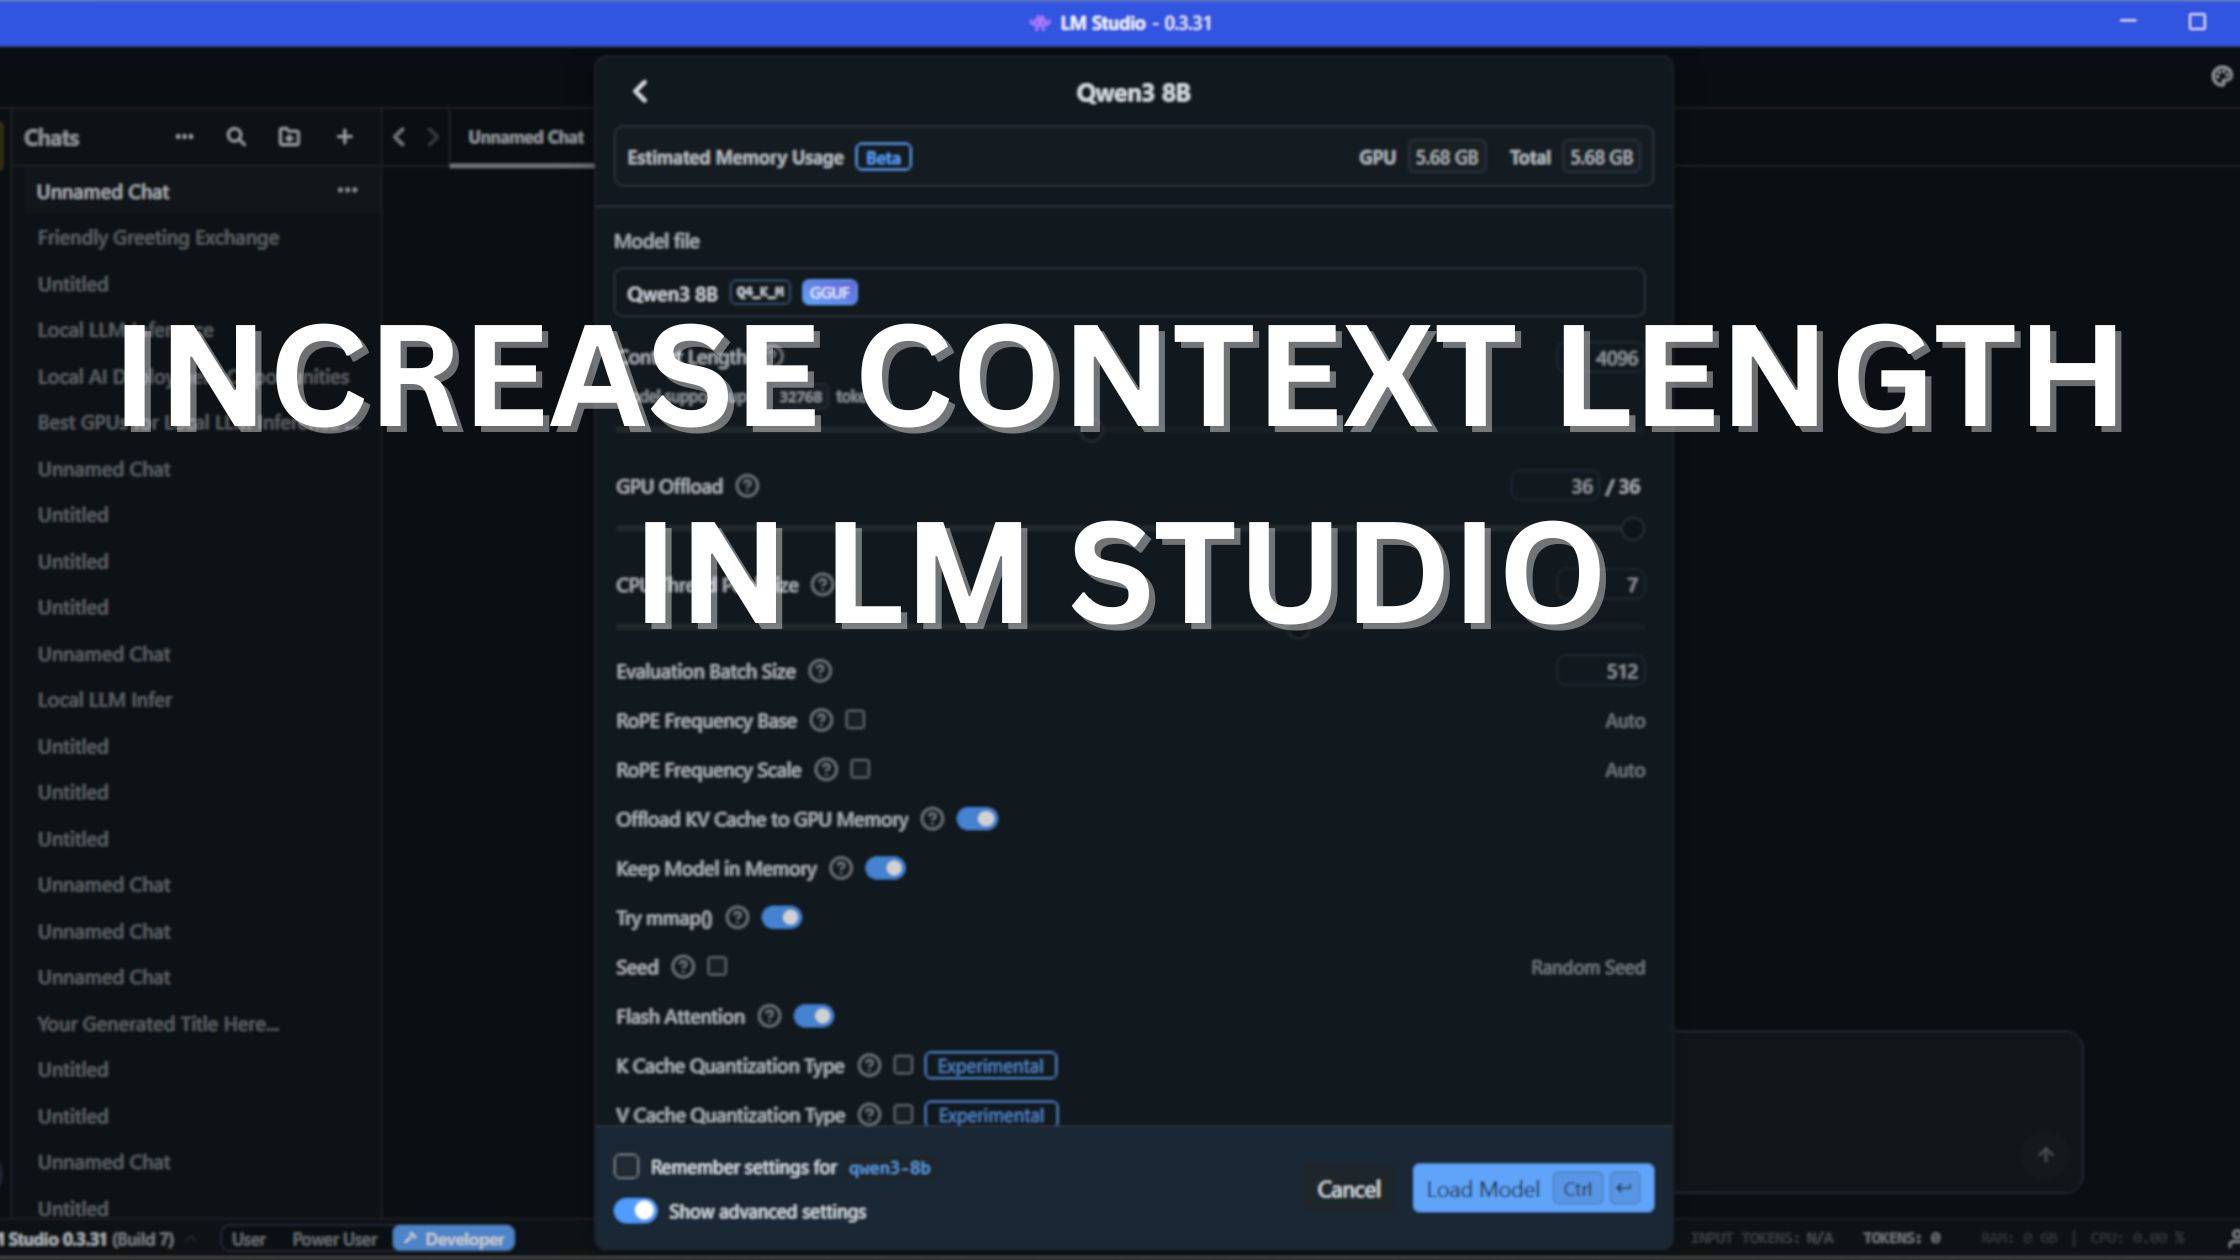
- Load for Coding: On your remote Colab machine, load the model with an expanded context window specifically tailored for coding tasks:
(To understand how pushing beyond 32k impacts your VRAM and generation speed, read our deep dive on Increasing Context Length in LM Studio).!lms load qwen3.5-9b --context-length 32000 - Start the Local API: Open your local LM Studio desktop app, navigate to the Developer tab (the
< >icon on the left sidebar), and click Start Server on port1234. (If you are running headless on your local machine, runlms server start --port 1234in your terminal instead).
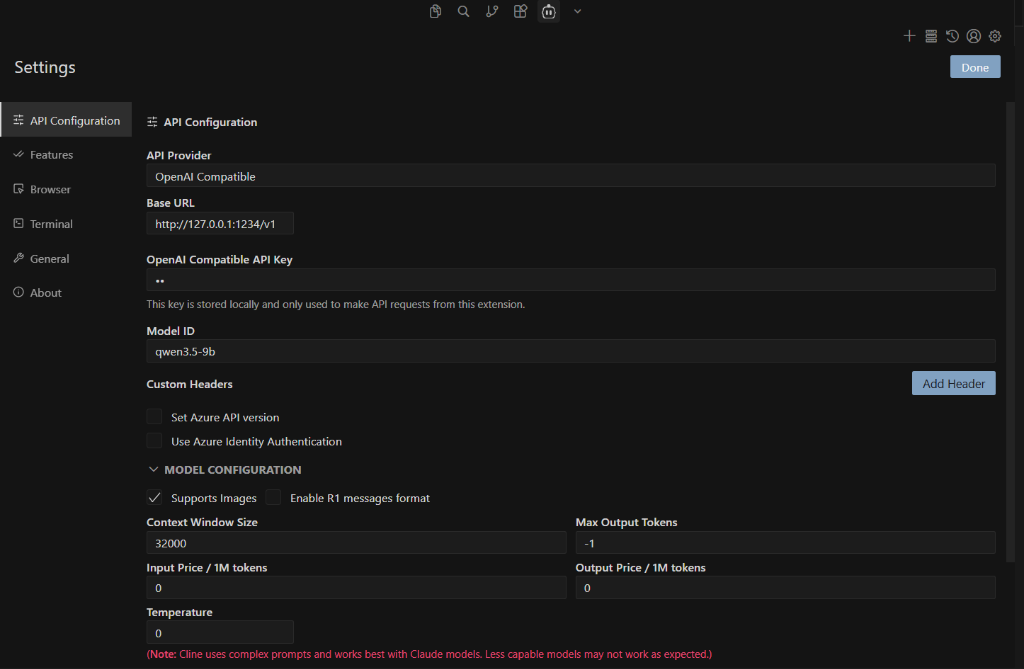
VS Code Extensions (Cline, Kilo Code, Open Code)
In your VS Code extension settings, configure the provider as an OpenAI Compatible endpoint:
- Base URL:
http://127.0.0.1:1234/v1 - API Key:
lm-studio(or any placeholder string) - Model ID:
qwen/qwen3.5-9b(or whichever identifier your model requires) - Context Window Size: Match what you allocated in Colab (e.g.,
32000)
Here is what the configuration interface looks like for popular tools (such as Cline):
Terminal Integrations (Claude Code & Codex)
You can also perfectly route CLI-based agents through LM Link. Export the local host configuration variables in your terminal before running the agent:
Claude Code:
export ANTHROPIC_BASE_URL=http://localhost:1234
export ANTHROPIC_AUTH_TOKEN=lmstudio
claude --model qwen3.5-9b
Codex:
codex --oss -m qwen3.5-9b
For more integration examples, check out the official LM Link integrations documentation.
Your coding tools will now send massive codebase queries directly to your local desktop. The LM Studio daemon intercepts those requests and instantly tunnels them over the encrypted LM Link mesh to be processed by the free T4 GPU!
The Complete LM Studio CLI (LMS) Notebook at a Glance
If you don't want to copy and paste the cells manually, you can instantly launch our pre-built, heavily commented Google Colab notebook here:
🚀 Open and Run the Complete Notebook in Google Colab here!
Otherwise, here is the full sequence of code blocks to build it yourself:
# Cell 1: Install llmster & lms CLI
!curl -fsSL https://lmstudio.ai/install.sh | bash

# Cell 2: Add CLI to PATH
import os
os.environ["PATH"] += ":/root/.lmstudio/bin"

# Cell 3: Start daemon and Authenticate (Click the link!)
!lms daemon up
!lms login

# Cell 4: Verify network status
!lms link status

# Cell 5: Download and Load the model (with 32k context for coding)
!lms get qwen3.5-9b
!lms load qwen3.5-9b --context-length 32000

# Cell 6: Verify downloaded models (ls) and active in-memory models (ps)
print("--- Downloaded Models ---")
!lms ls
print("\n--- Active Models in Memory ---")
!lms ps

# Cell 7: Start the local API server and test it via Python
!lms server start

import urllib.request
import json

url = "http://localhost:1234/v1/chat/completions"
headers = {"Content-Type": "application/json"}
data = {
    "model": "qwen/qwen3.5-9b",
    "messages": [{"role": "user", "content": "Hello from Colab! Are you running on my remote GPU?"}],
    "temperature": 0.7
}

req = urllib.request.Request(url, headers=headers, data=json.dumps(data).encode("utf-8"))
with urllib.request.urlopen(req) as response:
    result = json.loads(response.read().decode("utf-8"))
    print("\nAPI Response:", result["choices"][0]["message"]["content"])
Run these cells in order, handle the lms login pairing step when prompted, and you'll have a free cloud GPU serving your LM Studio desktop app within about 10 minutes (plus model download time).
Wrapping Up
LM Link solves a real problem: it lets you offload the heavy lifting to any powerful machine. A cloud GPU, a home server, or a beefy desktop, and access it seamlessly from anywhere. Whether you're using the CLI, the GUI, or a mix of both, the underlying connection is always the same: encrypted, private, and zero-configuration.
This tutorial walked through the Colab setup as a concrete example, but the steps translate 1:1 to RunPod, vast.ai, AWS EC2, or any headless home server. Authenticate, enable, connect, that's it.
Frequently Asked Questions (FAQ)
What is LM Studio CLI?
LM Studio CLI (lms) is a fully featured command-line interface that ships with LM Studio 0.2.22 and newer, requiring no additional installation. It lets you load and unload models, start or stop the API server, download models, and more, all from the terminal.
What is LM Link in LM Studio?
LM Link is a built-in feature for remotely accessing a running LM Studio instance from anywhere. It creates a secure, end-to-end encrypted connection between the remote machine and your desktop app.
How much VRAM do I get on Google Colab's free tier?
Google Colab's free tier provides access to an NVIDIA T4 GPU with 16 GB of VRAM, which is enough to comfortably run quantized models up to 20B parameters and beyond.
Do I need ngrok or Cloudflare Tunnel to use LM Link?
No, LM Link natively creates a secure, end-to-end encrypted tunnel. It requires a free LM Studio account for authentication and avoids complex manual tunnel setups.
What happens if I have the exact same model loaded into memory on both devices?
In the GUI, you will see both models listed separately in the model picker dropdown (one with a local chip, one with a network chip), allowing you to manually click the one you want to use. However, when sending standard requests via the API (localhost:1234) or allowing the Chat interface to auto-route, LM Studio will always route the request to the local machine to minimize network latency.
How do I force my Python scripts to use the Colab model instead of my local one?
If you have the exact same model downloaded on both devices, you must ensure it is ONLY loaded into memory on the Colab machine (you can unload the local one via the GUI or CLI). If it is loaded in memory on both machines simultaneously, LM Studio will always route traffic to the local one. The "Set as preferred device" toggle in the desktop app (or lms link set-preferred-device in the CLI) only tells LM Studio to favor the remote device when initializing a new model load; it does not reroute active traffic.
Can I load a model on my desktop using the Colab CLI?
Yes! lms load is network-aware. If you run !lms load qwen3.5-9b in Colab, but the model isn't downloaded on Colab yet (and is downloaded on your linked desktop), the Colab CLI will actually trigger the load process on your desktop hardware! (If you run lms load interactively in a real terminal, it will provide a navigable menu asking you which device to load the model onto).
How do I know what models are currently taking up memory?
lms lslists all models that are downloaded and available across your entire LM Link network.lms pslists all models that are currently loaded into GPU/CPU memory (active), including which specific device is currently hosting them.